WelderDestiny › Welding Engineering Tools › Calculating Welding Costs
Calculating Welding Costs and Times
Calculating welding costs and times are important because welding can be a significant part of the costs in fabricating welded structures and components. Knowing how to estimate the volume of weld to be deposited, and the typical time it will take to perform the welding is important to prepare quotations and also to plan schedules.
The WelderDestiny Compass: Weekly e-zine Subscription
You can take a look at "The WelderDestiny Compass" back-issues by clicking here.
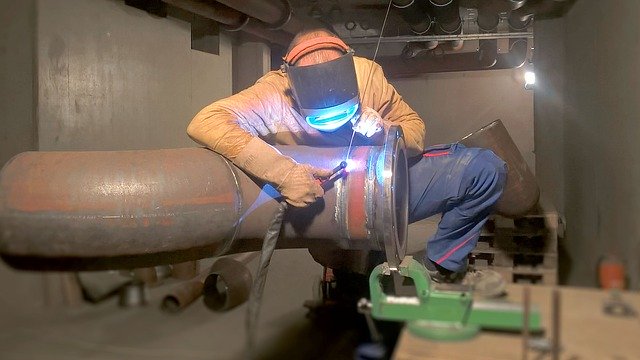 Welding With the Gas Tungsten Arc Welding (GTAW) Process: GTAW is typically a low deposition rate process.
There
are many resources available that approach the issues associated with calculating welding costs from different perspectives,
so it is important to note that there are a number of ways to get to an answer.
The approach taken in this web page is a relatively fundamental approach that
should be easily modified for use in most instances. The steps taken to calculating welding costs and times are as follows:
- Calculate the volume of weld metal to be deposited. This is essentially based on the weld preparation and the length of weld.
- Calculate the mass of weld metal that needs to be deposited, based on the density of the particular material that you are working with.
- Apply a “recovery factor” to the weld mass calculated, to estimate the total amount of welding consumable needed. (Some of the consumable will be wasted and will not end up in the joint. For instance, in the case of Shielded Metal Arc Welding (SMAW) there will be stub losses, slag losses and spatter losses.)
- Based on the mass of welding consumable needed, you will now be able to find out the cost of the welding filler metals by getting an appropriate quote from your filler metal supplier. This does not account for “supplementary” consumables such as shielding gas or grinding discs etc. You will need to calculate those costs separately, based on the type of job it is that you will be doing.
- Calculate the time it would take to deposit the necessary mass of weld metal, based on a deposition rate for the particular welding process that you will be using. This value assumes a 100% “arc on” time.
- Apply an “arc on factor” to take account of the fact that no welder ever welds 100% of the time. There will be times when s/he needs to remove a stub and replace with another electrode, or perform some grinding or other cleaning between weld runs etc. Obviously this factor will be different for each welder, but you can start with a typical industry accepted value, and refine this for your particular business or project. (Your business may be more or less efficient than the industry average, or the particular job may be more difficult, resulting in a lower arc on percentage. This is often the case for maintenance type work)
- This will now tell you how many “man hours” it will take to complete the job.
- Based on the man hours, you can then estimate the length of time it will take to complete the job, by deciding how many welders will be welding at the same time.
- Based on the man hour calculation, and the assumption you have made of the number of welders welding at the same time, you can estimate how many welders you need, and for how long. When calculating your manpower costs at this point, do not forget to add in an allowance for assistants, and also “unproductive time” associated with your company’s systems and processes. (Think safety meetings, morning meetings, quality circles, safety inspections or other administrative processes.)
- Each business will also have some “overhead cost” allowance based on the total time the job will take. This takes account of the cost of management, quality control personnel, equipment, indirect consumables etc. These overhead costs will be different for each company, and will also vary widely between different industries. Sometimes the estimator just uses a factor based on the costs calculated above (e.g. Multiply costs calculated by 1.5 to account for overheads.) and sometimes it will be an “overhead rate” based on the number of welding man hours. (e.g. $50 per man hour overhead cost.)
Please keep in mind that this discussion on calculating welding costs is only looking at the welding operation. It does not take account
of costs associated with materials or boiler making / construction activities.
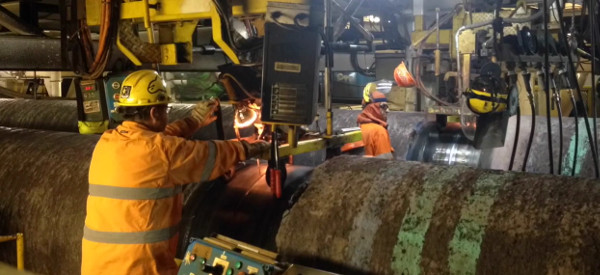 Welding Pipeline Double Joints With Submerged Arc Welding: SAW is typically a high deposition rate process.
Estimating Packages For Calculating Welding Costs
Calculating welding costs and times would obviously be rather time consuming if we have to re-calculate the basics for every
estimate you need to do, so most businesses will have some kind of automated
estimating system. There are a number of generalized commercial estimating
packages available, that can be used for almost any type of work. The
shortcoming of most of these generalized estimating systems is that the
methodology for calculating welding costs and times are not not included in enough detail. In this situation, calculating welding times and costs are typically included in more specialized estimating
applications that focus on the welding operation.
Many
businesses therefore have a combination of commercial estimating packages,
combined with a selection of spreadsheets to provide some inputs to the
commercial estimating package. Obviously, some businesses just use a selection
of spreadsheets to do their estimates, which would include calculating welding costs and times. This is especially the case for smaller
businesses.
Help With Calculating Welding Costs and Times
To
help you with the calculating welding costs and times, we have made available a spreadsheet
that does the welding volume and time based calculations. You can download the spreadsheet by clicking here. While I have been careful to make a spreadsheet that makes reasonably accurate calculations, WelderDestiny does not take any responsibility for the answers you get from this spreadsheet. Please use at own risk.
To
help get you on your way, below are some explanations on how to use the
spreadsheet for calculating welding costs and times. The spreadsheet contains two worksheets.
The first worksheet deals with bevel, butt and fillet welds. The second deals
with TYK joints. The TYK joints are addressed separately because they are a lot
more complicated to calculate the weld volume.
Guidelines for calculating welding costs and times for the “Bevel Butt Fillet”
worksheet:
- In the “Bevel Butt Fillet” worksheet, the weld details are captured on the top left hand side.
- In the first column there are 5 different types of weld preparations described. (Each weld preparation has been replicated 4 times, to allow you to enter more than one of each type if needed.) This is highlighted in yellow.
- The next 5 columns deal with the different dimensions associated with the different weld preparations. This is where you enter the raw dimensional data for the calculations. These columns have been highlighted in light blue. To exclude any row from the calculations, ensure that the value in the “Length” column is zero. (Currently, typical values have been entered, just to offer some guidance.) Please take note of the units used for the different dimensions. This worksheet has been completed in SI units. If there is enough demand, I will reproduce this in Imperial units, although it would be quite easy for you to make those modifications yourself.
- The next 4 columns are the outputs of the calculations. (Please note that if you change anything in these columns, then the calculations will be affected, so be careful.) The calculations here take into account the dimensional data, along with the filler metal and welding details further down on the left hand side of the worksheet. These columns have been highlighted in light green.
- Sketches showing the different weld preparations and the associated dimensions are also included just to the right and below the calculation table.
- The filler metal details are entered in the light blue highlighted cells on the left hand side below the calculation table.
- The welding details are entered in the light blue highlighted cells below the filler details.
- Below the welding details is a list of terms used in the worksheet.
- To the bottom right of the worksheet, in line with the filler details are some typical values that can be used for different welding processes and materials. Just above this are a couple of “quick calculators” for converting pounds per hour to kilogram per hour and inches to millimeters.
- To the bottom of the worksheet there are a lot of reference materials to help make decisions regarding deposition rates and efficiencies. Please take care of the units, as some of the references are in Imperial units and some in SI units. You can use the “quick calculators” to make any unit conversions required, before entering the values into the worksheet.
- The results from the worksheet calculations are summarized in the “Total” row that has been displayed in a bold red font. The total filler requirement, including the allowance for weld metal recovery percentage is given in the “Total Filler Required” cell.
 Typical Deposition Rates That Can Be Expected With The Different Welding Processes.
Please
note that the dimensional details entered in the worksheet will be subjected to
values entered in the filler details and the welding details to obtain the
necessary calculations. This means that you can only deal with a single filler
metal and a single welding process at a time. This does complicate calculating welding costs and times for multi process welds, but it can still
be done as follows:
- First apply the dimensional and welding data as though you were only welding the root process. For example, if the root process was going to be a 1000mm long, 4mm thick Gas Tungsten Arc Welding (GTAW) deposit on a 20mm thick plate using a 60° included angle single Vee weld with a 4mm root gap, then you will enter: a = 30; b = 2; T = 4; h = 0; Length = 1. (Make sure that you enter the necessary GTAW values in the filler details and welding details sections.)
- Next, apply the dimensional and welding details as though you were only welding the filler and cap process. If we are going to weld the rest of the joint described in the point above with the Flux Cored Arc Welding (FCAW) process, then we will enter the following information for the FCAW section: a = 30; b = 5; (This is an approximation of what the “root gap” would be if we removed the GTAW section.) T = 16; (20mm plate thickness minus the 4mm for the root process.) h = 3mm; (An approximation of how high the cap reinforcement will be.) Length = 1 (Make sure that you enter the necessary FCAW values in the filler details and welding details sections.)
- The filler metal and man hour values calculated from the two points above can then be used appropriately to perform the rest of the cost and time estimate calculations.
The
guidelines for calculating welding costs and times for the “TYK Joints” worksheet are as follows:
- This worksheet is geared to “T” and “Y” joints between two pipe sections intersecting in a single plane. Out of plane pipe intersections, and “K” joints that intersect at the node would require some modifications to get accurate answers, although the answers will not be too far off.
- On the top left hand side of the worksheet, we have the main dimensional information. This is largely based on the diameter of the smaller member, and the angle that the smaller member makes with the main member.
- The light blue cells are where you need to enter the necessary information.
- The light green cells show you calculated information. As a general rule you do not want to mess around with the green cells.
- Below the dimensional information on the top left hand side is where the filler information is entered. (In the light blue cells.)
- For the TYK Joints worksheet you need to enter the information for the root and the “main” welding processes. This allows you to do the entire calculation in one go, when you have different processes for the root and filler / cap. If you only have one process, then enter a root thickness of 0mm.
- Below the filler and welding process details sections on the worksheet, is the “TYK Joint Weld Detail Information” input section. This is a matrix that further defines the weld preparation details for the different parts of the weld.
- Only enter the relevant dimensional information in the cells that have been highlighted in light blue. The cells highlighted in light green are calculated values, so do not mess with those cells.
- To assist in choosing which of the different weld details are appropriate, there are four sketches included on the right hand side of the worksheet. (Detail 36; Detail 37; Detail 38; Detail 39)
- You need to select one “Toe of Weld” row, one “Sides of Weld” row and one “Heel of Weld” row to use in the calculations. You select this by placing a 1 (Yes) or 0 (No) in the relevant cell of column “G” of the weld detail matrix. Be guided by the descriptions in column A and the angles given in column B. (Note that this is based on the details given in AWS D1.1, but you need to select the most appropriate weld details.
- Please disregard the grey highlighted block on the bottom right hand side of the worksheet. This is used for embedded calculations. If you mess with these cells, you will get wrong answers.
- The calculated filler metal quantities and man hours are specified below the weld detail information, and is highlighted in pink.
- Please read the “Notes” section on the bottom left hand side of the worksheet for further guidance on the use of the worksheet.
By
using the worksheets supplied, you should be able to get the necessary welding
consumable and welding man hour values required to perform the higher level
costing estimates for your welding job.
WelderDestiny › Welding Engineering Tools › Calculating Welding Costs
The WelderDestiny Compass: Weekly e-zine Subscription
You can take a look at "The WelderDestiny Compass" back-issues by clicking here.